|
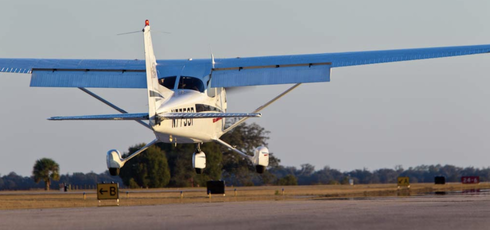
There is no such thing as a "landing". A pilot does not "land" the aircraft; the aircraft does not "land" on the runway or grass strip. Student pilots the world over are constantly stressing out and worrying about this ugly, scary big event called "landing," but what they don't realize is that this event isn't real. At least not in the way they think of it.
In reality, the successful termination of a flight occurs when an airplane is flying through the air and the earth happens to get in the way of the landing gear. That is it. The end. Now that we've cleared that up, I'd like to say a few things about smart ways a pilot can help induce this collision between rubber and pavement. Slow Flight If this event we call "landing" did exist after all, it would actually be found within the realm of slow flight, which is the condition of flight where induced drag becomes greater than parasitic drag. This is where a student learns how to land the airplane. This is where the understanding that pitch controls airspeed and power controls rate of descent will be solidified because there is no big scary "landing" to be done and there is no ground nearby to bounce off of. Slow flight at altitude conveniently provides the best classroom possible for a student to experience "landing". Depending on the student, I introduce slow flight within the first one or two real lessons. To help make it more exciting to them, I let them know before the flight that I am going to teach them how to land the airplane today because slow flight IS how the airplane lands. The “how” of slow flight can be boiled down to just 2 actions: use pitch to control airspeed and power to control rate of descent. Notice that I said power controls rate of descent, NOT the usual “power controls altitude.” This is a very important distinction because in this case, while landing, we are (or should be!) in a constant and gradual descent. If the airplane begins to descend too rapidly and our gradual descent turns into a falling brick, we use power to slow the descent. If we notice that we are above the PAPI or VASI glide path, we can reduce power to increase the rate of descent to get back on track, and then increase as necessary to maintain the angle, rather than take the more instinctual and incorrect action of pointing the nose down. I spend a LOT of time with students on slow flight, particularly in landing configuration. I want them to be able to hold 65 or 70 knots with pitch and be able to adjust their rate of descent in 100 foot increments. Though they miss a lot of the important visual cues at altitude, becoming familiar with the subtlety of adjusting pitch and power to maintain and adjust constant airspeed descents helps develop the feel required to pull this off near the ground. Once the student can do this, I will find a long and wide runway, ideally 7000+ feet in length, and have the student set up for a long straight-in final (or an extended downwind and base). We execute the exact same slow flight exercise that we did at altitude, only this time we have added visual cues outside the aircraft, such as a runway to point down, and ground and obstacles in our peripheral vision to help aid us in becoming familiar with what a gradual descent looks like. Now we will have visual cues as well as the seat of our pants (developed at altitude) to help us. I have my student fly in a very gradual slow flight descent down the glide path, and once we are above the threshold, I have them begin to arrest their descent with power. I tell my student beforehand that the point is not to put the airplane on the ground. Instead, we are just going to do slow flight in a very, very gradual descent down the long runway. The runway MIGHT get in our way, and if that happens, then great. Congratulations, you just “landed” the airplane. Ta-da. Though there is a little bit more involved in landing (the roll out, crosswind, etc), what has just been done is the meat and potatoes of the whole thing. If the aircraft never makes contact with the ground, I just practice a go-around as we near the final couple thousand feet of the runway. Disclaimer: The instructor should be watching closely and should be comfortable with the student’s general tendencies before attempting this because a big bounce or porpoise could be a great time for an instructor to jump in and take over. It is also important that the student doesn’t become scared from a scary experience. It can be wise for the instructor to fly the aircraft the first time around and show them what the exercise should feel and look like. The idea behind this approach to teaching landings is that it conveys that the landing of an aircraft is entirely accomplished by a controlled descent, using pitch to maintain airspeed and power to control rate of descent, and that a “pretty” landing is just an extremely gradual, shallow slow flight up until the moment the wheels descend into the runway. Landing is not a big event; it is not a single skill or technique in itself - it is just mastery of slow flight.
Looking for more educational reading? Check out the Learning Center.
In the market for Online Ground School? We recommend this one.
4 Comments
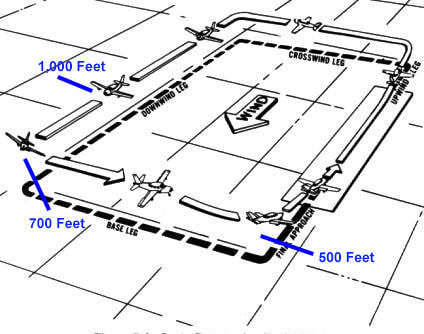
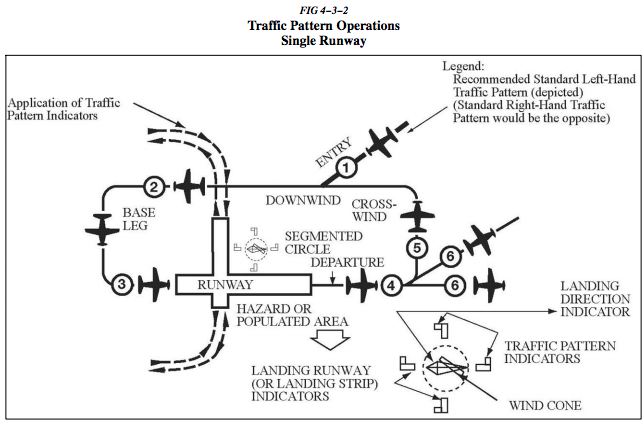
One thing that might be of tremendous help when working to perfect your traffic pattern is selecting certain altitudes for key points in the traffic pattern. This gives a measurable aiming point and will help assure a more stabilized approach. It should be noted that these are just general guidelines that help in a standard situation. An airport with a non-standard traffic pattern, or a traffic pattern requiring extended or shortened pattern legs may require a different approach (literally!). The AIM says that unless otherwise stated for a particular airport, 1,000 feet AGL shall be used as the standard traffic pattern altitude. During a standard downwind in a small single-engine piston airplane, the pilot should maintain this 1,000 feet AGL until abeam the touch down point or runway numbers. The pilot should plan their descent so that they arrive at about 700 feet AGL when they make their downwind to base turn. They should continue their descent to arrive at 500 feet AGL when turning base to final. This 500 feet AGL should provide a safe altitude from which the pilot can judge if they are too low or two high (the result of improper altitude control or too wide/too tight a base leg). Remember, a good landing begins in the traffic pattern. Practice your landings and aim for consistency each time. How many different ways have you seen a pilot enter the traffic pattern at an uncontrolled airfield? Some fly straight-in; others cross midfield and enter downwind. There are even some who fly directly into a tight base and are still rolling wings level when they touchdown. The Aeronautical Information Manual (AIM) specifies only ONE way to enter the traffic pattern at an uncontrolled airport: the 45-degree entry. This is the ONLY entry that should be used, and though the AIM is not regulatory, it is wise to follow the guidelines that it sets out.
Sure, if you are approaching an airport on the side opposite the active traffic pattern, crossing over mid-field can be a good way to enter the pattern. It keeps you from flying wide detours to position yourself for a 45-degree entry, and allows you to assess the traffic situation. But it is not a good practice to enter downwind directly from midfield, nor is it good practice to cross mid-field at the traffic pattern altitude. Instead, crossing midfield should be done about one thousand feet above traffic pattern altitude, and should be extended to a point from which a standard 45-degree entry can be made (about 3-4 miles out). Flying at traffic pattern altitude could cause a conflict with traffic already established in the pattern. Flying at only 1,500 feet (500 feet above most pattern altitudes) could cause a conflict with large or turbine-powered aircraft in the pattern, since they are advised to fly at 1,500AGL in the pattern. Because of this, flying 1,000 feet above the traffic pattern should provide better spacing for all types of traffic. Cross mid-field and continue outbound for a few miles before making a 135-degree turn to begin your 45-degree entry to downwind. The descent may begin during the outbound portion of the mid-field crossing, or it may be during the turn to establish the 45-degree entry. Either way, it is smart to be at traffic pattern altitude by the time the airplane is on the 45-degree entry to downwind - perhaps 3 or 4 miles from the field. This will help other aircraft that are in the pattern to spot you because they will be looking for you at traffic pattern altitude. It will also help to be stabilized at the correct altitude so that there is less to deal with during the high workload period before landing. |
|
- Home
-
Flight Instruction
- Private Pilot Flight Training
- Remote Pilot Part 107 Drone UAS Training
- Sport Pilot Flight Training
- Instrument Rating Flight Training
- Commercial Pilot Flight Training
- Multi-Engine Flight Training
- CFI Flight Training
- ATP Flight Training
- Bend Flight Training
- Flight Simulators
- Flight Review
- Paragliding and Paramotoring
- Private Pilot Ground School
-
Courses & Books
- Learning Center
- Contact
- Pilot Resources
- Our Goal
- News
- Ferry Pilot Services
- Contract Pilot Services
- Oregon Flight Instructor Jobs


