Oregon Flight School
  • Home
  • Flight Instruction
    • Private Pilot Flight Training
    • Remote Pilot Part 107 Drone UAS Training
    • Sport Pilot Flight Training
    • Instrument Rating Flight Training
    • Commercial Pilot Flight Training
    • Multi-Engine Flight Training
    • CFI Flight Training
    • ATP Flight Training
    • Bend Flight Training
    • Flight Simulators
    • Flight Review
    • Paragliding and Paramotoring
  • Private Pilot Ground School
  • Courses & Books
    • IFR Ground Course
    • Commercial Pilot Courses >
      • Part I: Passing Your Checkride
      • Part II: Low Time Flying Jobs
      • Part III: Your First CoPilot Job
    • Professional Pilot Courses >
      • Part 91 Hawaii Flight Course
      • Aircraft Management Course
    • The Pilots Guide To Low Time Flying Jobs
    • Flying Part 91 To Hawaii: A Pilot's Guide
  • Learning Center
    • General
    • Landing
    • Takeoff
    • Airspace
    • Airplane Systems
    • Emergencies
  • Contact
  • Pilot Resources
    • Flight Training Scholarships
    • Find An Aviation Medical Examiner (AME)
    • BasicMed
  • Our Goal
  • News
  • Ferry Pilot Services
  • Contract Pilot Services
  • Oregon Flight Instructor Jobs

Picking Altitude Points in the Traffic PAttern

12/15/2017

1 Comment

 
Picture
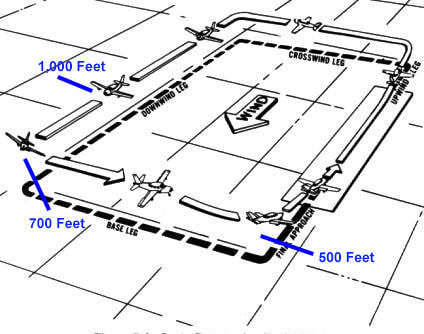
One thing that might be of tremendous help when working to perfect your traffic pattern is selecting certain altitudes for key points in the traffic pattern. This gives a measurable aiming point and will help assure a more stabilized approach. It should be noted that these are just general guidelines that help in a standard situation. An airport with a non-standard traffic pattern, or a traffic pattern requiring extended or shortened pattern legs may require a different approach (literally!).

The AIM says that unless otherwise stated for a particular airport, 1,000 feet AGL shall be used as the standard traffic pattern altitude. During a standard downwind in a small single-engine piston airplane, the pilot should maintain this 1,000 feet AGL until abeam the touch down point or runway numbers. The pilot should plan their descent so that they arrive at about 700 feet AGL when they make their downwind to base turn. They should continue their descent to arrive at 500 feet AGL when turning base to final. This 500 feet AGL should provide a safe altitude from which the pilot can judge if they are too low or two high (the result of improper altitude control or too wide/too tight a base leg).

Remember, a good landing begins in the traffic pattern. Practice your landings and aim for consistency each time. 

1 Comment
Heather A link
12/11/2020 06:36:17 pm

Hello, nice blog

Reply


Leave a Reply.

Home
Flight Instruction
Courses & Books
Contact Us
Copyright Oregon Flight School © 2022
  • Home
  • Flight Instruction
    • Private Pilot Flight Training
    • Remote Pilot Part 107 Drone UAS Training
    • Sport Pilot Flight Training
    • Instrument Rating Flight Training
    • Commercial Pilot Flight Training
    • Multi-Engine Flight Training
    • CFI Flight Training
    • ATP Flight Training
    • Bend Flight Training
    • Flight Simulators
    • Flight Review
    • Paragliding and Paramotoring
  • Private Pilot Ground School
  • Courses & Books
    • IFR Ground Course
    • Commercial Pilot Courses >
      • Part I: Passing Your Checkride
      • Part II: Low Time Flying Jobs
      • Part III: Your First CoPilot Job
    • Professional Pilot Courses >
      • Part 91 Hawaii Flight Course
      • Aircraft Management Course
    • The Pilots Guide To Low Time Flying Jobs
    • Flying Part 91 To Hawaii: A Pilot's Guide
  • Learning Center
    • General
    • Landing
    • Takeoff
    • Airspace
    • Airplane Systems
    • Emergencies
  • Contact
  • Pilot Resources
    • Flight Training Scholarships
    • Find An Aviation Medical Examiner (AME)
    • BasicMed
  • Our Goal
  • News
  • Ferry Pilot Services
  • Contract Pilot Services
  • Oregon Flight Instructor Jobs