Oregon Flight School
  • Home
  • Flight Instruction
    • Private Pilot Flight Training
    • Remote Pilot Part 107 Drone UAS Training
    • Sport Pilot Flight Training
    • Instrument Rating Flight Training
    • Commercial Pilot Flight Training
    • Multi-Engine Flight Training
    • CFI Flight Training
    • ATP Flight Training
    • Bend Flight Training
    • Flight Simulators
    • Flight Review
    • Paragliding and Paramotoring
  • Private Pilot Ground School
  • Courses & Books
    • IFR Ground Course
    • Commercial Pilot Courses >
      • Part I: Passing Your Checkride
      • Part II: Low Time Flying Jobs
      • Part III: Your First CoPilot Job
    • Professional Pilot Courses >
      • Part 91 Hawaii Flight Course
      • Aircraft Management Course
    • The Pilots Guide To Low Time Flying Jobs
    • Flying Part 91 To Hawaii: A Pilot's Guide
  • Learning Center
    • General
    • Landing
    • Takeoff
    • Airspace
    • Airplane Systems
    • Emergencies
    • Weather
    • Professional Pilot
  • Contact
  • Pilot Resources
    • Flight Training Scholarships
    • Find An Aviation Medical Examiner (AME)
    • BasicMed
  • Our Goal
  • News
  • Ferry Pilot Services
  • Contract Pilot Services
  • Oregon Flight Instructor Jobs

Stalling a Jet & Simulated Dual-Engine Failure to a Deadstick Landing in a Jet

2/24/2021

1 Comment

 
During recent recurrent and single-pilot exemption training in the Cessna Citation CE-500 series, I was lucky enough to get train in one of my employer's airplanes. This was my first official recurrent training event, and my initial type rating training up to that point had been in simulators, so it was exciting to experience training in an actual jet. I will discuss a few of the most exciting and interesting parts of the experience below.

Stalls in a Jet

Picture
My instructor gave me the following instructions for each and every stall recovery. These instructions are also the exact same as one would follow for a missed approach:
  1. Max Power - Flaps Approach
  2. Positive Rate, Gear Up
  3. Climb at V2
  4. V2+10, Flaps Up
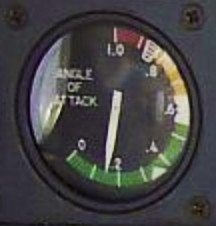
One of the coolest things about this training was that I was able to see for myself that my AOA indicator actually works as described. The AOA indicator (above photo) in the CE-551 is calibrated to indicate a stall at just above .8, which is the boundary between the yellow and red zones of the indicator. Like clockwork, as the airplane hit .8 AOA, a quick (1-2 seconds) buffet shook the plane and the nose dropped fairly rapidly. My instructor reinforced the idea of pitch control by showing that all one had to do was gently lower the nose and the airplane would resume flying. By this, he meant lower the nose by a relatively small amount, and then HOLD that pitch - and what this looked like was the airplane had broken the stall with the nose still well above the horizon! I found out that by an excessive lowering of the nose, pitching up to recover induced a secondary stall very quickly - even if done gently.

No need to dive towards the ground here. The Citation recovers very easily from stalls of all kinds, including clean stalls, approach stalls, departure stalls, and stalls done while in a bank. Anyone who can recover from a stall in a Cessna 150 or 172 could easily do so in a Citation.

Simulated Dual Engine Failure and Glide to a Deadstick LAnding in a Jet

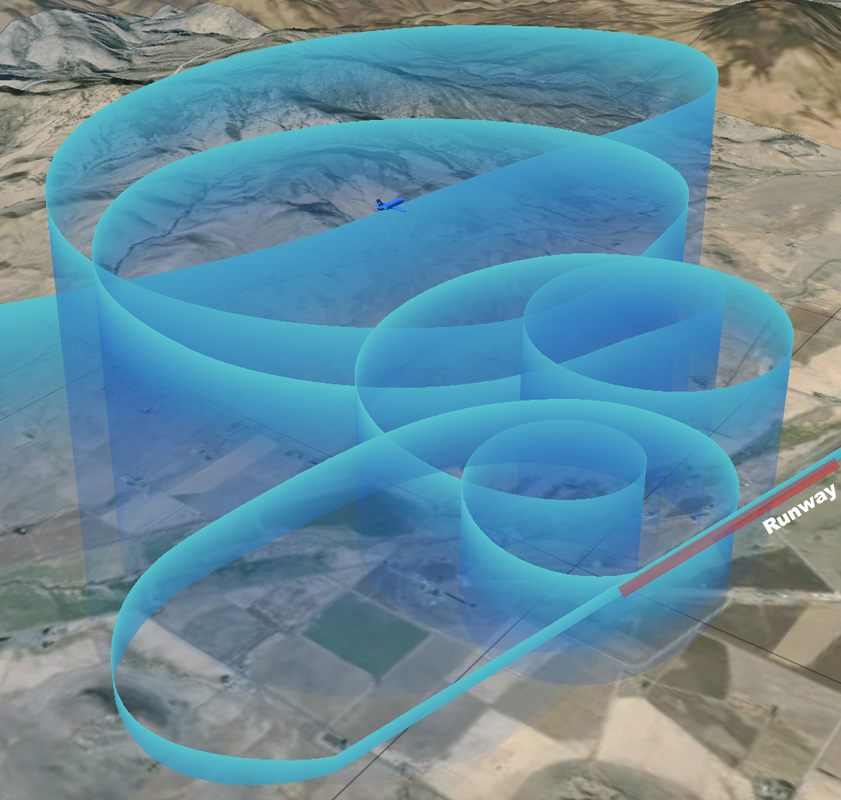
Here was a fantastic exercise in energy management. My instructor had me overfly an airport at 10,000 feet above the runway, aligned with the runway, and using the zoomed-in moving map on the GPS to fine tune my position. not long before arriving over the numbers, my instructor had me pull the throttles to idle and pitch to hold altitude and slow down so that I would arrive over the numbers at exactly 40 knots. Once over the numbers, still 10,000 feet above the runway, I was instructed to begin a 30-degree bank to the left and use pitch to hold EXACTLY 140 knots (I was able to hold it +/- 3 knots most of the time).

Recall the Commercial Pilot Steep Spiral maneuver, and that is very close to what we were doing here, except instead of steep turns at a constant radius around a point on the ground, my goal was to hold 140 knots in a descent and continuously circle so that at the completion of each turn, I was once again over the numbers, pointing straight down the runway. This meant that I had to correct for wind by adjusting my angle of bank. What this looked like on this particular flight, with wind from the west (over runway 35), was a 20-25 degree bank for the first half of the turn (slower ground speed due to the crosswind-turned-headwind) and a 35-40 degree bank for the second half of the turn (higher ground speed from the crosswind-turned-tailwind).

Using this technique, we were losing almost exactly 2,000 feet per circle that we flew. The first two circles were done, and we were now 6,000 feet above the runway. Going into the next circle, my instructor had me fly into a 50 degree bank, which counterintuitively reduced my rate of descent to only about 1,000 feet per circle. Even though a higher angle of bank increases rate of descent in feet per minute, the much shorter radius of the turn meant that the turn was completed so much faster that by the time we had finished one circle, we had only lost about 1,000 feet.

I flew this 50 degree bank circle once, and then returned to the 30 degree bank circle. After that, my instructor had me complete one more 50 degree bank circle so that I would arrive back over the numbers at about 2,000ft above the field. 

Let me summarize this, since you may be lost:

Beginning of Maneuver: 10,000ft AGL, 140 KIAS
Circle #1: 30-degree bank, 2000 ft descent
Circle #2: 30-degree bank, 2000 ft descent
Circle #3: 50-degree bank, 1000 ft descent
Circle #4: 30-degree bank, 2000 ft descent
Circle #5: 50-degree bank, 1000 ft descent
At the end of this 5th circle, I was 2000 feet above the runway, still 140 KIAS. 
​
Below is a screenshot from ForeFlight of the track log so you get a better idea of what the maneuver looked like.

Picture
I then flew a slightly tighter than normal traffic pattern - still holding the all-Important 140 indicated airspeed - and flying a rounded base and final leg, I managed to glide the airplane to a gentle touchdown. Throughout the base and final legs of the approach, I used a combination of pitch, landing gear, and flaps to increase drag and slow down so that I touched down at an appropriate speed, just under Vref. I never once had to add power.

It wasn't the prettiest execution of this maneuver that my instructor had seen. In the heat of the moment, I ended up about 10 knots slow (about 130 knots indicated) while on downwind. This 10 knots was enough to really screw up my glide ratio, and I lost more altitude than I should have as a result. This meant that I had to keep flaps retracted a bit longer than I should have, and I was slightly lower than I should have been. But, the end result was the same - a no power glide to landing from 10,000 feet. This screw up of mine was a good teaching moment because it showed me just how much losing a measly 10 knots can affect my glide.

This maneuver reminded me quite a bit of the steep spiral to a power-off 180 that we did during commercial pilot certification...except on this occasion, I was in a jet. The point of this exercise, my instructor said, was that a dual-engine flame out and a glide to landing in a Citation is not a death sentence. ​
1 Comment
Arnold Charlson link
7/14/2022 01:12:41 am

Are you a good pilot? And can you land a jet without crashing it?

Reply


Leave a Reply.

    Author

    Michael Carlini
    + Commercial Pilot
    + Flight Instructor

    Picture
Home
Flight Instruction
Courses & Books
Contact Us
Copyright Oregon Flight School © 2022
  • Home
  • Flight Instruction
    • Private Pilot Flight Training
    • Remote Pilot Part 107 Drone UAS Training
    • Sport Pilot Flight Training
    • Instrument Rating Flight Training
    • Commercial Pilot Flight Training
    • Multi-Engine Flight Training
    • CFI Flight Training
    • ATP Flight Training
    • Bend Flight Training
    • Flight Simulators
    • Flight Review
    • Paragliding and Paramotoring
  • Private Pilot Ground School
  • Courses & Books
    • IFR Ground Course
    • Commercial Pilot Courses >
      • Part I: Passing Your Checkride
      • Part II: Low Time Flying Jobs
      • Part III: Your First CoPilot Job
    • Professional Pilot Courses >
      • Part 91 Hawaii Flight Course
      • Aircraft Management Course
    • The Pilots Guide To Low Time Flying Jobs
    • Flying Part 91 To Hawaii: A Pilot's Guide
  • Learning Center
    • General
    • Landing
    • Takeoff
    • Airspace
    • Airplane Systems
    • Emergencies
    • Weather
    • Professional Pilot
  • Contact
  • Pilot Resources
    • Flight Training Scholarships
    • Find An Aviation Medical Examiner (AME)
    • BasicMed
  • Our Goal
  • News
  • Ferry Pilot Services
  • Contract Pilot Services
  • Oregon Flight Instructor Jobs